
In an era where RV travel is increasingly popular, ensuring your motorhome is equipped to handle modern electrical demands is paramount. In the article “Step-by-Step Instructions for Upgrading Your RV from 30 amp to 50 amp,” embark on a journey of empowerment as we guide you through the process of enhancing your RV’s electrical capacity. From understanding the intricacies of amperage to expert tips on safely executing the upgrade, this comprehensive guide offers invaluable insights for RV enthusiasts seeking to adapt to evolving power needs and enhance their on-the-road experience. Whether you’re a seasoned traveler or a novice adventurer, prepare to elevate your RV lifestyle with confidence and ease.
Step-by-Step Instructions for Upgrading Your RV from 30 amp to 50 amp
If you’re looking to upgrade your RV’s electrical system from 30 amp to 50 amp, then you’re in the right spot! Sign up today and get access to TONS of education and information on how to do this properly from an incredible community of RVers and campers, like you.
Here’s an overview:
- Understanding the Differences Between 30 Amp and 50 Amp Systems
- Assessing Your RV’s Electrical System and Compatibility for the Upgrade
- Gathering the Necessary Tools and Equipment
- Shutting off Power and Ensuring Safety Measures
- Installing the New 50 Amp Power Inlet
- Upgrading the Circuit Breaker and Wiring
- Testing and Troubleshooting the Upgraded System
- Considering Additional Upgrades for Optimal Power Management
- Consulting with a Professional Electrician for Complex Installations
- Tips for Maintaining and Maximizing the Performance of Your Upgraded RV Electrical System
Understanding the Differences Between 30 Amp and 50 Amp RV Systems
When it comes to RV electrical systems, there are two common options: a 30 amp system and a 50 amp system. Understanding the differences between these two systems is crucial for anyone considering upgrading their RV from a 30 amp to a 50 amp system. Here’s a breakdown of the key differences between the two:
- Amperage Capacity: The main difference between a 30 amp system and a 50 amp system lies in their amperage capacity. A 30 amp system can handle a maximum load of 30 amps, while a 50 amp system can handle up to 50 amps. This means that a 50 amp system has a greater capacity to power more appliances and electrical devices simultaneously.
- Power Distribution: RVs with a 30 amp system typically have a single air conditioning unit and fewer electrical appliances. The 30 amp system is designed to distribute power to these appliances adequately. On the other hand, a 50 amp system is equipped to handle two air conditioning units and a higher number of electrical appliances. The extra capacity allows for more power-hungry appliances to operate simultaneously without overloading the system.
- Electrical Outlets: Another difference between the two systems lies in the type of electrical outlets they use. A 30 amp system utilizes a three-pronged plug, while a 50 amp system uses a four-pronged plug. The additional prong in the 50 amp plug allows for the transmission of more power, accommodating the higher amperage capacity of the system.
- Wiring and Breaker Size: The wiring and breaker size are also factors that differentiate the 30 amp and 50 amp systems. A 30 amp system typically uses a 10-gauge wire, while a 50 amp system requires 6-gauge wire. The breaker size for a 30 amp system is usually 30 amps, while a 50 amp system generally uses a 50-amp breaker. Upgrading from a 30 amp to a 50 amp system may require rewiring and installing larger breakers to accommodate the increased power load.
- Compatibility: It’s important to note that not all RVs can be easily upgraded from a 30 amp to a 50 amp system. RVs must have the necessary wiring and breaker capacity to handle the increased power load. Before attempting an upgrade, it’s advisable to consult an electrician or RV technician to determine if your RV can support a 50 amp system safely.
Understanding the differences between 30 amp and 50 amp systems is essential when considering an RV upgrade. By knowing the capacities, power distribution, electrical outlets, wiring, and breaker sizes of each system, RV owners can make informed decisions about upgrading their electrical system to better suit their power needs.
Assessing Your RV’s Electrical System and Compatibility for the Upgrade
Before proceeding with the upgrade from a 30 amp to a 50 amp electrical system in your RV, it is important to assess your current electrical setup and determine its compatibility for the upgrade. This will ensure that the process goes smoothly and that your RV can safely accommodate the higher power capacity.
Here are the steps to follow when assessing your RV’s electrical system:
- Review your RV’s specifications: Firstly, refer to the owner’s manual or consult the manufacturer to understand the electrical specifications of your RV. This will provide you with important information such as the current electrical capacity, the type of electrical connection (30 amp or 50 amp), and any specific requirements for the upgrade.
- Inspect your RV’s power cord: Examine your RV’s power cord to identify its plug type and determine whether it is a 30 amp or 50 amp connection. The 30 amp plug typically has three prongs, while the 50 amp plug has four prongs. If you have a 30 amp plug, upgrading to a 50 amp system may require replacing the power cord and installing a new 50 amp receptacle.
- Check your RV’s circuit breaker panel: Locate your RV’s circuit breaker panel, which is usually housed in a cabinet or compartment. Take note of the existing circuit breakers and their amperage ratings. A 30 amp system typically has one main breaker rated at 30 amps, while a 50 amp system will have two main breakers, each rated at 50 amps.
- Inspect your RV’s wiring: Carefully examine the wiring throughout your RV to ensure it is in good condition and capable of handling the increased electrical load. Look for any signs of wear, damage, or loose connections. If you notice any issues, it is important to address them before proceeding with the upgrade.
- Consider additional electrical components: Assess whether your RV has any additional electrical components that may need to be upgraded for compatibility with a 50 amp system. This may include appliances, air conditioners, or other devices that draw a significant amount of power. Consult the manufacturer’s specifications for each component to determine their compatibility with a 50 amp system.
By thoroughly assessing your RV’s electrical system and compatibility, you will have a clearer understanding of the steps required to complete the upgrade. If you are unsure or unfamiliar with electrical work, it is recommended to consult a professional electrician who specializes in RV electrical systems to ensure the upgrade is done safely and correctly.
SPECIAL OFFER JUST FOR YOU! Use promo code e3teamvip to get 25% off ANY membership!
Gathering the Necessary Tools and Equipment To Upgrade Your RV 30 Amp to 50 Amp
Before beginning the process of upgrading your RV from 30 amp to 50 amp, it is important to gather all the necessary tools and equipment. Having everything on hand will ensure a smooth and efficient upgrade. Here are the essential tools and equipment you will need:
- Multimeter: A multimeter is an indispensable tool for any electrical work. It measures voltage, current, and resistance, which will be crucial in determining the proper connections and troubleshooting any issues that may arise during the upgrade process.
- Wire Strippers: Wire strippers are used to remove the insulated coating from the wires. They make the process of connecting and disconnecting wires much easier and ensure a clean and secure connection.
- Crimping Tool: A crimping tool is necessary for securely attaching terminals or connectors to the wires. It provides a strong and reliable connection, preventing any loose or frayed connections that could lead to electrical issues.
- Electric Drill: An electric drill with various drill bits will come in handy when creating holes for new wiring or mounting brackets. Make sure you have a range of drill bit sizes to accommodate different needs.
- Electrical Tape: Electrical tape is used to insulate and protect exposed electrical connections. It prevents the risk of electrical shock and helps maintain the integrity of the wiring.
- Cable Cutters: Cable cutters are essential for cleanly cutting through heavy-duty electrical cables. They make the process quick and precise, ensuring neat and secure connections.
- Wire Connectors: Various wire connectors, such as butt connectors, ring terminals, and spade connectors, will be needed for making connections between wires. These connectors provide a secure and reliable connection that is essential for safe and efficient electrical distribution.
- 50 amp RV Power Cord: The 50 amp RV power cord is the main component of the upgrade. It is designed to handle the increased power load and provide a reliable connection between the RV and the power source.
- Mounting Brackets: Mounting brackets are required for securing the new 50 amp outlet receptacle. They provide stability and ensure that the outlet is securely attached to the RV.
- Screwdrivers: A set of screwdrivers with different sizes and types (such as Phillips and flathead) will be necessary for loosening and tightening electrical connections, as well as removing screws for mounting brackets.
- Safety Equipment: Don’t forget to gather essential safety equipment such as safety goggles, gloves, and a fire extinguisher. These items will ensure your safety during the upgrade process.
By gathering all the necessary tools and equipment before you begin the upgrade, you will save time and effort. Having everything readily available will enable you to work efficiently, resulting in a successful and safe RV upgrade.
Shutting off Power and Ensuring Safety Measures When Upgrading 30 Amp to 50 Amp
Before beginning any electrical work on your RV, it is essential to shut off the power supply and take necessary safety measures. This will help prevent accidents and ensure your personal safety throughout the upgrading process.
- Disconnect from the Shore Power: The first step is to disconnect your RV from the shore power source. This will ensure that no electricity is flowing through the system while you work on it. Locate the shore power connection on the exterior of your RV and unplug it.
- Turn Off the Main Breaker: Once you have disconnected from the shore power, locate the main breaker panel inside your RV. This is usually mounted on the wall or in a utility compartment. Carefully open the panel and find the main breaker switch. Flip the switch to the “off” position. This will shut off the power supply from the RV’s internal electrical system.
- Wear Protective Gear: Before starting any electrical work, it is important to protect yourself by wearing appropriate gear. Safety glasses and gloves should be worn to protect your eyes and hands from potential hazards.
- Use a Voltage Tester: To further ensure safety, it is recommended to use a voltage tester to check for any remaining electrical current in the system. Test each outlet and electrical component to verify that there is no voltage present. If the tester indicates voltage, double-check your power sources and breaker switches to ensure they are properly shut off.
- Secure the Electrical Equipment: As you work on upgrading your RV from 30 amp to 50 amp, be mindful of any loose electrical wires or equipment. Secure any loose connections or wiring to prevent accidental contact or damage during the process.
- Follow Proper Wiring Procedures: When upgrading to a 50 amp system, it is crucial to follow proper wiring procedures. Adhere to the manufacturer’s instructions and guidelines for your specific RV model. If you are unsure about any steps or procedures, consult a professional electrician to ensure proper installation and safety.
In summary, shutting off the power and ensuring safety measures are crucial steps when upgrading your RV from 30 amp to 50 amp. By disconnecting from the shore power, turning off the main breaker, wearing protective gear, using a voltage tester, securing the electrical equipment, and following proper wiring procedures, you can ensure a safe and successful upgrade for your RV’s electrical system.
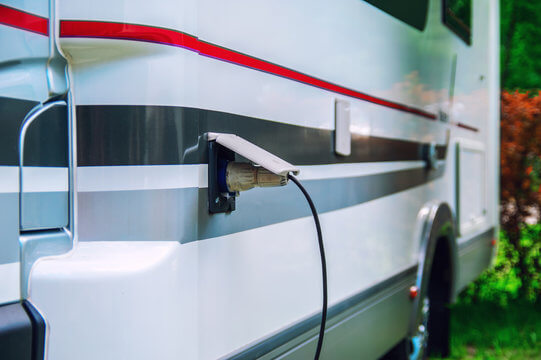
Installing the New 50 Amp Power Inlet In Your RV
Upgrading your RV from a 30 amp to a 50 amp power system will require installing a new power inlet to accommodate the higher amperage. This process may seem intimidating, but by following these step-by-step instructions, you can easily and safely complete the installation.
- Safety first: Before beginning any electrical work, always ensure the power source is disconnected. This includes unplugging the RV from the shore power and shutting off the circuit breaker at the main electrical panel.
- Choose the right power inlet: Select a 50 amp power inlet that is compatible with your RV’s electrical system and fits the designated space on the exterior of your vehicle. It is recommended to consult your RV’s manual or consult with a professional to ensure you choose the correct inlet.
- Locate the installation point: Determine the optimal location for the new power inlet on the exterior of your RV. It should be easily accessible and have enough clearance to connect the power cord without any obstructions.
- Prepare the installation area: Clean the installation area to remove any dirt or debris that could interfere with the installation process. If necessary, use a drill and appropriate drill bit to create a hole for mounting the power inlet.
- Mount the power inlet: Attach the power inlet to the exterior of your RV using the provided screws or mounting hardware. Make sure it is securely fastened to prevent any movement or damage during use.
- Connect the wiring: Follow the manufacturer’s instructions to properly connect the wiring to the power inlet. This typically involves connecting the incoming power supply wires to the appropriate terminals and ensuring a tight and secure connection.
- Grounding the power inlet: The power inlet must also be properly grounded to ensure safety. Connect the grounding wire to the designated grounding terminal on the power inlet, making sure it is securely fastened.
- Double-check the connections: Once the wiring and grounding are complete, double-check all connections to ensure they are secure and properly tightened. Inspect the wiring for any signs of damage or wear.
- Test the installation: Before re-applying power, it is essential to test the installation to ensure everything is functioning correctly. Turn on the circuit breaker at the main electrical panel and plug in the RV’s power cord to the new 50 amp power inlet. Verify that power is successfully flowing to the RV and check for any abnormal sounds, smells, or sparks.
Once you have completed the installation and everything is working properly, you can confidently enjoy the benefits of the upgraded 50 amp power system in your RV. Remember to always follow safety precautions and consult a professional if you are unsure or uncomfortable with any aspect of the installation process.
Upgrading the Circuit Breaker and Wiring In Your RV
One of the key steps in upgrading an RV from 30 amp to 50 amp is to upgrade the circuit breaker and wiring. This is necessary because a 50 amp system requires higher capacity to handle the increased electrical load.
Step 1: Determine the circuit breaker size
The first step is to determine the size of the circuit breaker needed for the 50 amp system. This can be done by checking the electrical panel or consulting the RV manufacturer’s specifications. It is important to ensure that the circuit breaker is sized correctly to avoid overloading the electrical system.
Step 2: Shut off the power
Before starting any work on the electrical system, it is crucial to shut off the power to the RV. This can be done by disconnecting the RV from the power source or turning off the circuit breaker that supplies power to the RV.
Step 3: Remove the old circuit breaker
Once the power is turned off, the next step is to remove the old 30 amp circuit breaker. This can usually be done by unscrewing the mounting screws and disconnecting the wires from the terminals. It is recommended to label the wires or take a picture before disconnecting to ensure proper reconnection later.
Step 4: Install the new 50 amp circuit breaker
After removing the old circuit breaker, the new 50 amp circuit breaker can be installed. This involves connecting the incoming power wires to the appropriate terminals and securing the breaker to the electrical panel using the mounting screws.
Step 5: Upgrade the wiring
In addition to upgrading the circuit breaker, it is crucial to upgrade the wiring to accommodate the higher amperage of the 50 amp system. This may involve running new wires from the electrical panel to the RV’s power distribution system. It is recommended to use high-quality wiring that is rated for 50 amps to ensure safety and performance.
Step 6: Test the system
Once the circuit breaker and wiring upgrades are complete, it is essential to test the system to ensure everything is working correctly. This can be done by reconnecting the RV to the power source and checking for any issues such as tripped breakers or faulty connections. It is also advisable to consult a qualified electrician or RV technician to perform a thorough inspection and ensure compliance with electrical codes.
Upgrading the circuit breaker and wiring is a critical step in upgrading an RV from 30 amp to 50 amp. By following the proper procedures and guidelines, RV owners can ensure a safe and reliable electrical system that can handle the increased power demands of a 50 amp system.
SPECIAL OFFER JUST FOR YOU! Use promo code e3teamvip to get 25% off ANY membership!
Testing and Troubleshooting the Upgraded System In Your RV
After completing the upgrade from a 30 amp to a 50 amp system in your RV, it is important to properly test and troubleshoot the new setup to ensure everything is functioning as expected. This step is crucial for identifying any potential issues or malfunctions and addressing them promptly.
Here are some recommended steps to follow when testing and troubleshooting the upgraded system:
- Check power supply: Start by verifying that you have a proper power supply connection to your RV. Ensure that the incoming power source, such as a campground pedestal or generator, is providing the correct voltage and frequency for a 50 amp system. Use a multimeter to measure the voltage and ensure it matches with the specifications of your RV.
- Inspect wiring connections: Carefully inspect all the wiring connections made during the upgrade process. Ensure that all connections are secure and tight, and there are no loose wires or exposed connections. Loose or faulty connections can lead to power fluctuations or electrical hazards. Pay special attention to the connections at the main breaker panel and the transfer switch.
- Perform load testing: Connect various appliances and electrical devices to the upgraded system and test their functionality. Start with low-demand devices such as lights and gradually add higher-demand appliances like air conditioners, heaters, and kitchen appliances. This will help you assess the system’s capability to handle increased power requirements and identify any overload issues.
- Monitor voltage and amperage: While testing different devices, use a digital multimeter or an onboard power monitoring system to measure the voltage and amperage levels. Ensure that the voltage remains within the acceptable range and that the amperage does not exceed the capacity of your new 50 amp system. If you notice any significant fluctuations or abnormalities, it may indicate a problem with the wiring or the electrical components.
- Check for hot spots: Use a thermal imaging camera or a non-contact infrared thermometer to detect any hot spots along the wiring or electrical components. Overheating can be an indication of an underlying issue such as a loose connection or an overloaded circuit. If you notice any hot spots, investigate further and address the problem promptly to prevent potential damage or safety hazards.
- Test the transfer switch: The transfer switch is responsible for switching between the external power source and the onboard generator, if applicable. Test the transfer switch by connecting the RV to the external power source and then initiating a transfer to the generator. Ensure that the transfer switch operates smoothly and that power is being supplied seamlessly. Any malfunctions or delays in the transfer process should be investigated and resolved.
- Verify proper grounding: Finally, check the grounding of your upgraded system to ensure it meets the necessary safety standards. Verify that the grounding conductor is connected securely and that it is properly bonded to the main electrical panel. A solid grounding connection is essential for protecting your RV’s electrical system and preventing electrical shocks or fires.
By following these testing and troubleshooting steps, you can ensure that your upgraded RV electrical system is functioning correctly and safely. It is important to address any issues or abnormalities promptly to prevent further damage and ensure a smooth operation of the 50 amp system. If you are unsure about any aspect of the testing or troubleshooting process, it is recommended to consult a professional electrician or RV technician for assistance.
Considering Additional Upgrades for Optimal Power Management In Your RV
Once you have successfully upgraded your RV from a 30 amp to a 50 amp electrical system, you may want to consider additional upgrades for optimal power management. These upgrades can help ensure your RV runs smoothly and efficiently, especially when you are using multiple appliances or running power-hungry devices.
1. Surge Protector
Investing in a good quality surge protector is essential to protect your RV’s electrical system from power surges or voltage fluctuations. A surge protector will monitor the incoming power and cut off the supply in case of any irregularities or dangerous voltage spikes. This can prevent damage to your appliances and electrical system, saving you from costly repairs in the long run.
2. Energy Management System
An energy management system can help you keep track of your RV’s power usage and manage it efficiently. These systems often come with a display panel that shows you real-time information about your power consumption, voltage levels, and other important data. With an energy management system, you can monitor and control your energy consumption, allowing you to make adjustments and save energy where possible.
3. Battery Monitoring System
If your RV has a battery bank, installing a battery monitoring system can be beneficial. This system provides you with important information about your batteries, such as their voltage, temperature, and state of charge. This allows you to keep track of your battery’s health and performance, ensuring they are always in optimal condition. Additionally, a battery monitoring system can provide early warnings of potential battery issues, helping you address them before they become a larger problem.
4. Solar Panels
Consider installing solar panels on your RV to harness the power of the sun and reduce your reliance on traditional power sources. Solar panels can generate electricity during the day, recharging your batteries and powering your RV’s electrical system. This can be especially useful when you are boondocking or camping in remote areas with limited access to power hookups. Installing solar panels can help you save on energy costs and make your RV more eco-friendly.
5. LED Lighting
Replacing your RV’s traditional incandescent lights with LED lights can significantly reduce your power consumption. LED lights are more energy-efficient and have a longer lifespan than traditional bulbs. By upgrading to LED lighting, you can save on electricity and reduce the strain on your RV’s electrical system.
6. Efficient Appliances
Consider upgrading your appliances to more energy-efficient models. Energy-efficient appliances consume less power, reducing your overall energy consumption. Look for appliances with the Energy Star label or similar certifications, as they meet strict energy efficiency guidelines. Upgrading to energy-efficient appliances can not only help you save on energy costs but also improve the overall functionality and performance of your RV.
By considering these additional upgrades for optimal power management, you can enhance the efficiency and functionality of your RV’s electrical system. These upgrades can help you save on energy costs, extend the lifespan of your appliances and batteries, and ensure a more enjoyable and hassle-free RVing experience.
Consulting with a Professional Electrician for Complex Installations
When it comes to upgrading your RV from a 30 amp to a 50 amp system, it’s important to note that this is a complex task that requires extensive knowledge and expertise in electrical systems. While some DIY enthusiasts may feel confident in their abilities to tackle such a project on their own, it is highly recommended to consult with a professional electrician before proceeding.
A professional electrician will have the necessary skills and experience to assess your RV’s electrical system and advise you on the best course of action for the upgrade. They can help determine if your current electrical wiring and components are compatible with a 50 amp system, or if any modifications or upgrades are needed.
One of the main reasons to consult with a professional electrician is that they will ensure the installation is done safely and up to code. Electrical work can be hazardous if not done correctly, and working with higher amperage systems requires special precautions and expertise. A professional electrician will have the knowledge of local electrical codes and regulations and ensure that the installation meets these standards.
Another benefit of consulting with an electrician is that they can provide guidance on selecting the appropriate equipment for the upgrade. They will assess your power needs and recommend the right components, such as a 50 amp circuit breaker, wiring, and outlets, based on your specific RV and usage requirements. This will help ensure that your RV’s electrical system can handle the increased power demand without any issues.
Additionally, an electrician can help troubleshoot any potential problems that may arise during the installation process. They have the expertise to identify and resolve electrical issues and can provide solutions to any technical challenges that may come up. This can save you time and frustration and ensure that the upgrade is completed efficiently.
In summary, consulting with a professional electrician is crucial when it comes to complex installations like upgrading your RV from 30 amp to 50 amp. They will provide expert guidance, ensure safety and compliance with electrical codes, help select the right equipment, and troubleshoot any issues that may arise. This will ultimately result in a successful and reliable upgraded electrical system for your RV.
Tips for Maintaining and Maximizing the Performance of Your Upgraded RV Electrical System
Once you have successfully upgraded your RV from 30 amp to 50 amp, it is important to take certain steps to ensure that your electrical system is properly maintained and that you are maximizing its performance. Here are some valuable tips to keep in mind:
- Regularly inspect your electrical system: It is crucial to inspect your upgraded RV electrical system periodically to identify any potential issues or signs of wear and tear. Check for loose connections, frayed wiring, or any other visible damage. Fixing any problems early on can help prevent more significant issues down the line.
- Keep your electrical system clean: Keep the area around your electrical system clean and free from dust or debris. Regularly clean the connectors and terminals to ensure optimal conductivity. This will help prevent any buildup or corrosion that can interfere with the performance of your electrical system.
- Manage your power load: With a 50 amp electrical system, you have the benefit of increased power capacity. However, it is important to ensure that you are not overloading the system. Be mindful of the total power demands of your appliances and equipment. Distribute the power load evenly and consider using power management devices if necessary.
- Use high-quality electrical components: Invest in high-quality electrical components such as power cords, adapters, surge protectors, and circuit breakers. These components play a crucial role in maintaining the safety and performance of your upgraded electrical system. Choose products that are specifically designed for use in RVs and have a good reputation for reliability.
- Practice electrical safety: Electrical safety should be a top priority when using your upgraded RV electrical system. Always follow the manufacturer’s instructions for your electrical components and equipment. Properly ground your RV and use surge protectors to guard against power surges. If you are not confident in your electrical knowledge, consider consulting a professional electrician for assistance.
- Educate yourself: Take the time to educate yourself about your upgraded RV electrical system. Understand how it works, the different components involved, and how to troubleshoot common problems. This knowledge will not only enable you to maintain and maximize its performance but also help you identify potential issues and address them promptly.
- Keep spare parts and tools handy: It’s a good idea to keep spare electrical parts and tools in your RV for emergency situations. This may include extra fuses, circuit breakers, connectors, and wire crimping tools. Being prepared means you can quickly address any electrical issues that arise when you’re on the road.
By following these tips, you can ensure that your upgraded RV electrical system remains reliable, efficient, and safe. Proper maintenance and responsible power usage will help extend the lifespan of your equipment and provide you with a worry-free RVing experience.
Important Notes for Upgrading Your RV from 30 Amp to 50 Amp
- Compliance with Electrical Codes and Standards:
- It is crucial that all electrical work complies with local, state, and national electrical codes and standards. These regulations are designed to ensure safety and legality. Before beginning any work, familiarize yourself with the relevant codes, or consult a professional to ensure your upgrade is compliant.
- Complexity and Professional Consultation:
- Upgrading an RV’s electrical system from 30 amp to 50 amp is a complex task that requires a solid understanding of electrical systems. If you are not experienced in electrical work, it is highly recommended that you consult with a licensed electrician. Incorrect installation can lead to severe risks such as electrical shocks, fire hazards, or damage to your RV’s electrical system.
- Proper Grounding:
- Ensuring proper grounding throughout the entire RV’s electrical system is essential for safety. Improper grounding can result in electrical shock or other dangerous situations. Verify that the new power inlet, as well as all outlets and appliances, are correctly grounded. Using a GFCI (Ground Fault Circuit Interrupter) outlet tester can help confirm that your outlets are properly grounded.
- Wiring Specifications:
- When upgrading the wiring from 30 amp to 50 amp, it is essential to use wire that is properly rated for the increased amperage. Typically, this involves upgrading from 10-gauge to 6-gauge wire. Ensure all connections are secure and correctly installed to prevent overheating, which could lead to electrical fires.
- Use of Surge Protectors and Energy Management Systems:
- It is strongly recommended to install a surge protector and an Energy Management System (EMS) as part of your upgrade. These devices not only protect against power surges but also manage power distribution within your RV, preventing overloads when multiple high-demand appliances are used simultaneously.
- Safety Equipment and Precautions:
- Always use appropriate safety equipment, such as insulated gloves, safety goggles, and a voltage tester. Additionally, keep a fire extinguisher nearby when performing any electrical work. Double-check that the RV is disconnected from all power sources before beginning any work.
- Testing and Verification:
- After completing the upgrade, thoroughly test the entire electrical system. This includes verifying that all outlets are properly grounded, using a multimeter to check voltage levels, and ensuring that the system can handle the expected load without tripping breakers. Any issues should be addressed immediately, and it is advisable to have a professional electrician inspect the system to ensure everything is safe and up to code.
By carefully following these notes, you can significantly reduce the risks associated with upgrading your RV’s electrical system and ensure a safe, reliable upgrade that enhances your RV experience.
SPECIAL OFFER JUST FOR YOU! Use promo code e3teamvip to get 25% off ANY membership!
Join the E3 Camping Membership today and become a part of a vibrant community that shares your passion for RV adventure. Together, we can make your dreams of RVing and camping a reality, while embracing the spirit of empowerment. When you sign up, you get instant access to our magazines, 200+ lessons and courses to be a better camper and RVer, tools, product discounts, events, a HUGE community of campers and RVers around the country, E3TV episodes, articles, and many other amazing things.