
E3 Camping has the secrets to optimal RV living with our latest blog post, where we unravel a treasure trove of expert tips specifically tailored to master the nuances of RV holding tank management. Navigating the challenges of waste disposal on the road can be a daunting task, but fear not – our comprehensive guide provides a roadmap to keep your RV holding tanks in peak condition. From preventive maintenance strategies to eco-friendly practices and troubleshooting solutions, this post is your go-to resource for ensuring a seamless and sanitary experience during your travels. Delve into the world of expert insights as we share tried-and-true methods that will not only simplify your holding tank responsibilities but also contribute to a cleaner, more sustainable RV lifestyle. Say goodbye to uncertainties and embark on a journey where waste management becomes a stress-free aspect of your RV adventures.
Exploring the World of RV Holding Tanks: A Comprehensive Guide for Campers
Whether you’re a seasoned RV enthusiast or a novice camper, understanding the ins and outs of RV holding tanks is crucial for a seamless outdoor experience. While the convenience of having a bathroom on the go is unparalleled, the responsibilities of maintaining and emptying the tanks should not be overlooked. In this guide, we’ll delve into the nuances of handling RV holding tanks, ensuring a clean and odor-free journey.
The Trio of Tanks: Black, Gray, and Freshwater
In the realm of RV holding tanks, three players take the stage – the black-water tank, gray-water tank(s), and the freshwater tank. The black tank deals with toilet waste, while the gray tanks manage water from cooking, drinking, and bathing. Keeping these tanks in optimal condition requires strategic planning and proper maintenance.
Timing is Everything: Emptying the Tanks
While it may be tempting to empty the black tank at the first opportunity, experts recommend a more measured approach. The general rule of thumb is to wait until the black tank is about two-thirds full. This ensures sufficient water is present to facilitate the effective flushing away of solids. Proper drainage techniques play a crucial role in preventing clogs and maintaining the overall health of your RV’s plumbing system.
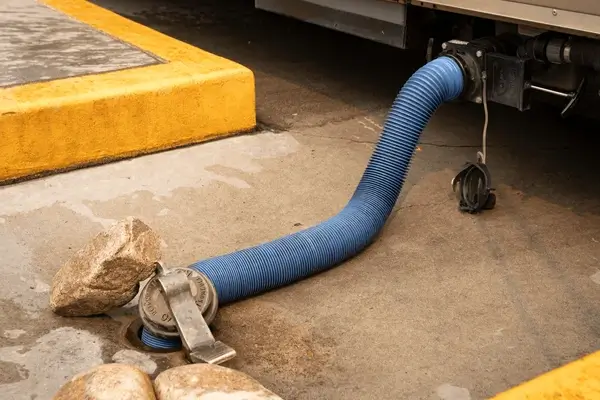
Mastering the Art of Tank Dumping
Dumping the tanks may seem like a dirty chore, but with the right technique, it can be quick and environmentally responsible. Start by connecting a 3-inch dump hose with a right-angle fitting to the sewer port. Ensure secure connections and use hoses with threads or locking tabs to prevent leaks and odors. Keep the tank valves closed until you’re ready to dump, and always empty the black tank before the gray tank to ensure a thorough cleaning process.
RV Toilet Tips for a Fresh Experience
Maintaining the RV toilet is a crucial aspect of the overall holding tank care. Use toilet paper designed for RV and marine waste systems to prevent clogs. When adding water or tank treatment, temporarily turn off the bathroom exhaust fan to avoid drawing odors from the black tank into the living quarters. Keep the black and gray tank drain valves closed in camp, and monitor levels to ensure timely emptying.
Black Tank Flush: A Cleansing Ritual
After emptying the black tank, a thorough flush is essential to remove any remaining contents. Options include using a clean-out wand attached to a water hose or utilizing a built-in tank flusher. Exercise caution to avoid overfilling the tank and always use a dedicated hose for flushing, separate from the freshwater hose. Seasoned RV owners often perform this process at least twice to guarantee a clean and odor-free tank.
Choosing the Right Holding Tank Chemicals
Holding tank chemicals come in various forms, from powders to drop-in packets and liquids. While they all aim to deodorize and break down solids, the choice between bacterial treatments, enzyme treatments, or conventional chemicals depends on individual preferences and environmental considerations. Regularly treating the RV’s holding tank after each dumping session is crucial for optimal performance.
Final Touch: Adding Water and Treatment
As the last steps in the holding tank maintenance routine, add at least 3 or 4 gallons of water to the black tank and include a holding-tank treatment to break down solids and minimize odors. This ensures a fresh start for your next adventure and contributes to the longevity of your RV’s plumbing system.
By following these guidelines and adopting a proactive approach to RV holding tank care, campers can enjoy a hassle-free and comfortable camping experience on the road.
Join the E3 Camping Membership today and become a part of a vibrant community that shares your passion for RV adventure. Together, we can make your dreams of RVing and camping a reality, while embracing the spirit of empowerment. When you sign up, you get instant access to our magazines, 200+ lessons and courses to be a better camper and RVer, tools, product discounts, events, a HUGE community of campers and RVers around the country, E3TV episodes, articles, and many other amazing things.